WA0SXV RS232 Display Board Construction Info
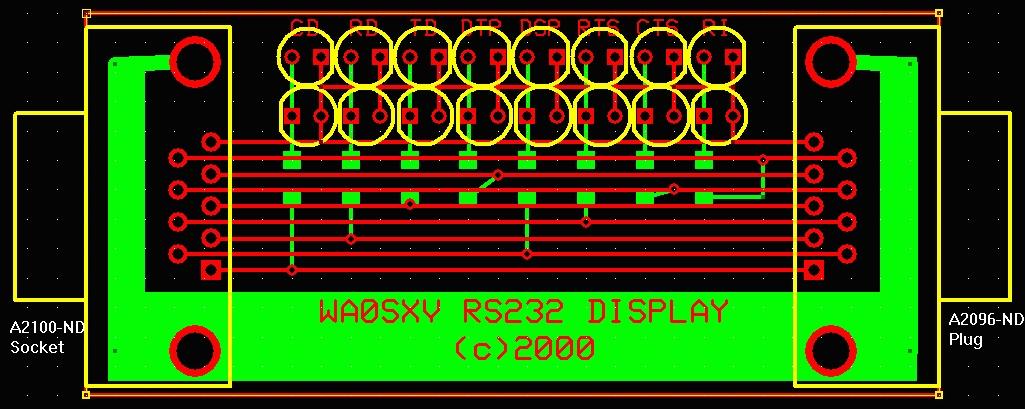
This is the board layout

Key construction information is simple:
1. Square pad on connectors is pin 1.
2. Square pad on LED's is the SHORT lead. The top row of LED's are green,
bottom row red.
3. Install smt resistors on reverse side first. These mount on the pads
in the middle of the board. See the picture on the previous page.
4. Then install connectors. For strength, attach using 4-40 hardware in
addition to the soldered pins.
5. Good idea is to install a RED LED on TXD and a GREEN LED on TXD and then try
it in real life before putting all of the rest in. With no data being
transmitted, the red LED should light.
I didn't use a jig of any sort to get the LED's seated down to the board.
Just positioned, soldered one lead and then properly soldered both. A
little bit of thinking would use a piece of cardboard or something taped to
the board to seat all of them and allow soldering all at once!
Parts list:
| Quantity | Description | Digikey p/n |
| 8 | Green miniature LED | 67-1070-ND |
| 8 | Red miniature LED | 67-1071-ND |
| 1 | 9-pin receptacle | A2100-ND |
| 1 | 9-pin plug | A2096-ND |
| 8 | 4.7k 1/8 w. 1206 resistor | P4.7KECT-ND |
Visitor number